The Ultimate Guide to Alternator Bearing Replacement: Step-by-Step Instructions and Troubleshooting
Introduction
The alternator, a crucial component of your vehicle's electrical system, is responsible for generating power and recharging your battery. Alternator bearings, located on either end of the alternator's rotor shaft, play a pivotal role in ensuring the smooth and efficient operation of this essential system. Unfortunately, like any other automotive component, alternator bearings are prone to wear and tear over time, leading to potential performance issues and even catastrophic failures.
Understanding Alternator Bearings
Alternator bearings are high-precision components designed to withstand extreme temperatures, vibrations, and loads. They consist of an inner race, an outer race, and ball bearings that roll between these races, enabling the rotor to spin freely.
Signs of Alternator Bearing Failure

Several telltale signs indicate potential alternator bearing failure:
-
Grinding or squealing noises: These noises, often heard when the engine is running, are a common symptom of worn-out or damaged bearings.
-
Dimming headlights: Insufficient power generation by the alternator, caused by bearing problems, can lead to flickering or dim headlights, especially at low engine speeds.
-
Overheating alternator: Excessive bearing friction generates heat, which can cause the alternator to overheat and potentially fail.
-
Battery not charging: When bearings seize or become severely damaged, the alternator may fail to generate enough power to recharge the battery, leading to a drained battery and vehicle breakdown.
Consequences of Ignoring Alternator Bearing Issues
Neglecting alternator bearing issues can have severe consequences:
-
Premature alternator failure: Worn-out bearings can lead to excessive wear on other alternator components, causing premature failure and costly repairs.
-
Electrical system damage: A seized alternator can cause voltage spikes and power surges, damaging other electrical components in your vehicle.
-
Engine damage: In extreme cases, a catastrophic alternator bearing failure can spread debris into the engine, causing significant engine damage.
DIY Alternator Bearing Replacement Guide
If you're confident in your mechanical abilities and have the necessary tools, replacing alternator bearings can be a cost-effective DIY project. Here's a step-by-step guide to help you through the process:
Tools and Materials:
- Socket wrench set
- Torx wrench set
- Puller tool (for removing the alternator pulley)
- Bearing separator
- New alternator bearings (matching the manufacturer's specifications)
- Grease
- Rags
Safety Precautions:
- Disconnect the negative battery terminal.
- Allow the engine to cool down before starting work.
- Wear safety glasses and gloves.
Step-by-Step Instructions:
-
Remove the alternator: Unplug any electrical connectors, remove the mounting bolts, and carefully remove the alternator from the engine.
-
Remove the alternator pulley: Use a puller tool to carefully remove the pulley from the alternator shaft.
-
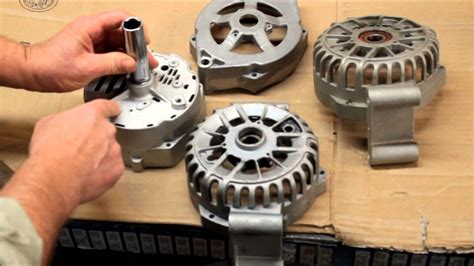
Separate the alternator housing: Locate the bolts or screws holding the alternator housing together and carefully separate the two halves.

-
Remove the old bearings: Use a bearing separator to gently pry off the old bearings from the rotor shaft.
-
Install the new bearings: Grease the new bearings and carefully press them onto the rotor shaft until they are fully seated.
-
Reassemble the alternator: Place the rotor into the alternator housing, aligning the bearings with their corresponding races. Carefully bolt the housing halves together.
-
Mount the pulley: Grease the pulley and carefully slide it onto the alternator shaft. Use the puller tool to press the pulley into place.
-
Reinstall the alternator: Place the alternator back into the engine and connect the mounting bolts. Tighten the bolts to the manufacturer's specified torque.
-
Connect the electrical connectors: Reattach any electrical connectors to the alternator.
-
Reconnect the negative battery terminal: Reconnect the negative battery terminal and start the engine.
Troubleshooting Common Issues
Alternator still makes noise:
* Check if the bearings are properly seated and greased.
* Inspect the rotor shaft for any signs of damage or wear.
* Consider replacing the alternator pulley as it may be worn or misaligned.
Alternator is not charging:
* Verify that the bearings are not seized or damaged.
* Check the electrical connections to the alternator and ensure they are secure.
* Measure the voltage output of the alternator to confirm proper operation.
Alternator overheats:
* Ensure that the bearings are not excessively tight or damaged.
* Check the alternator fan for any obstructions or damage.
* Inspect the cooling system for any issues that may be restricting airflow to the alternator.
Effective Strategies for Preventing Premature Bearing Failure
-
Regular maintenance: Regularly inspect the alternator and bearings for any signs of wear or damage.
-
Proper lubrication: Ensure that the bearings are adequately greased and that the alternator is maintained according to the manufacturer's recommendations.
-
Avoid overloading: Excessive electrical loads can put additional stress on the alternator and its bearings.
-
Early replacement: If you notice any symptoms of bearing failure, don't hesitate to replace them promptly to prevent further damage.
Common Mistakes to Avoid
-
Using improper bearings: Always use alternator bearings that meet the manufacturer's specifications for size, type, and quality.
-
Incorrect bearing installation: Ensure that the bearings are properly seated and aligned to avoid premature failure.
-
Overtightening bolts: Do not overtighten the bolts holding the alternator housing together, as this can damage the bearings.
-
Ignoring bearing noise: Any unusual noises coming from the alternator should be investigated and addressed promptly to prevent catastrophic failure.
Pros and Cons of Alternator Bearing Replacement
Pros:
- Cost-effective compared to alternator replacement
- Extends alternator lifespan
- Improves charging efficiency and battery life
Cons:
- Can be time-consuming
- Requires mechanical knowledge and tools
- May not be feasible for all vehicle models
FAQs
Q: How often should I replace alternator bearings?
A: Replacement frequency varies depending on driving habits and environmental conditions. As a general guideline, replace bearings every 60,000 to 100,000 miles.
Q: Can I replace alternator bearings without removing the alternator?
A: While possible in certain vehicle models, it is generally not recommended as it limits access and increases the risk of damage.
Q: What is the average cost of alternator bearing replacement?
A: Costs can vary widely depending on the vehicle model, labor rates, and bearing quality. Expect to pay between $200 and $600 for parts and labor.
Call to Action
If you suspect that your alternator bearings may be failing, don't hesitate to take action. Prompt replacement can prevent costly repairs and ensure that your vehicle's electrical system operates at optimal efficiency. Whether you choose to tackle the replacement yourself or seek professional assistance, prioritize alternator bearing maintenance to avoid potential breakdowns and extend the life of your alternator.
Humorous Stories and Lessons Learned
Story 1:
One day, a mechanic was called to repair a car that had a squealing alternator. After a thorough inspection, he discovered that the alternator was missing a bearing.
"How did this happen?" he asked the owner.
The owner replied, "Well, I was driving down the road when I hit a pothole. The alternator made a funny noise, but I kept driving. Then, the noise got worse, so I stopped and looked under the hood. That's when I saw that the bearing was missing."
The mechanic couldn't help but laugh. "You're lucky you didn't lose the whole alternator," he said.
Lesson: Don't ignore unusual noises coming from your alternator. Prompt attention can prevent costly repairs.
Story 2:
A woman took her car to a mechanic for an alternator repair. When she got the bill, she was shocked.
"This is outrageous!" she exclaimed. "How can you charge so much for something so small?"
The mechanic pointed to the alternator. "Ma'am, that's not small," he said. "That's the heart of your car's electrical system."
Lesson: Don't underestimate the importance of alternator maintenance. It's crucial for keeping your vehicle running smoothly.
Story 3:
A man was driving down a country road late at night when his alternator bearings seized. The car came to a sudden stop, stranding him in the darkness.
As he got out of the car to inspect the problem, he realized that he had no cell phone signal. He was all alone in the middle of nowhere.
After a few hours of shivering in the cold, he finally heard the sound of another car approaching. He waved his arms frantically, and the car stopped.
The man got into the stranger's car and explained his situation.
"Don't worry," the stranger said. "I have a spare alternator bearing in my trunk."
The stranger popped the hood and replaced the bearing in no time. The man was so grateful that he offered to pay the stranger, but the stranger refused.
"It's no problem," he said. "Just promise me that you'll pay it forward and help someone else when you're in a similar situation."
Lesson: Acts of kindness can make all the difference in times of need. Always be willing to help others, and don't hesitate to ask for help when you need it.
Tables
| **Bearing Type
