Replacing Trailer Bearings: A Comprehensive Guide to Safety and Longevity
Introduction
Trailer bearings are a critical component for the safe and reliable operation of trailers. They support the weight of the trailer and axle, allowing the wheels to rotate smoothly. Proper maintenance and timely replacement of trailer bearings are essential to prevent costly repairs, downtime, and potential safety hazards. This article provides a comprehensive guide to replacing trailer bearings, including safety tips, step-by-step instructions, and troubleshooting techniques.
Safety First
Always prioritize safety when working on trailers.
- Wear appropriate protective gear, including gloves, eye protection, and sturdy footwear.
- Engage the trailer's parking brake and chock the wheels to prevent the trailer from moving.
- Use a jack stand to support the trailer and prevent it from falling during maintenance.
Tools and Materials
Gather the necessary tools and materials before starting the replacement:
- New trailer bearings (matching the original size and type)
- Bearing grease
- Bearing packer
- Bearing separator
- Socket wrench
- Torque wrench
- Wheel bearing grease
- Sealant
- Rags or paper towels
Step-by-Step Guide
1. Remove the Wheel
- Use a socket wrench to loosen the lug nuts.
- Grip the wheel firmly and pull it straight towards you to detach it from the hub.
2. Remove the Bearing Buddy (if present)
- Unscrew the grease cap.
- Remove the cotter pin or retainer holding the hubcap in place.
- Pull the hubcap off and remove the bearing buddy.
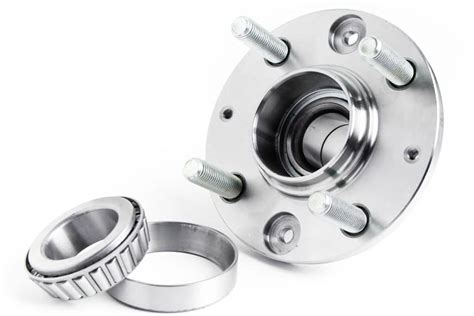
3. Remove the Hub Assembly
- Locate the bolts holding the hub assembly to the axle.
- Remove the bolts and carefully pull the hub assembly off the axle.
4. Separate the Bearing
- Use a bearing separator to safely separate the inner and outer bearings from the hub and axle.
5. Clean and Inspect
- Clean the hub, axle, and bearings thoroughly using rags or paper towels.
- Inspect the bearings for any signs of damage, such as cracks, pits, or excessive wear. Replace any damaged bearings.
6. Grease the Bearings
- Pack the new bearings with high-quality bearing grease using a bearing packer. Ensure that the bearings are fully coated.
7. Install the Bearings
- Place the inner bearing onto the axle.
- Place the hub assembly over the axle and carefully align it.
- Press the outer bearing onto the hub using a bearing packer.
8. Install the Hub Assembly
- Tighten the bolts holding the hub assembly to the axle to the specified torque.
- Insert the cotter pin or retainer into the hole provided to secure the hubcap.
9. Install the Bearing Buddy (if present)
- Insert the bearing buddy into the hub assembly.
- Install the hubcap and tighten the grease cap.
10. Reinstall the Wheel
- Place the wheel onto the hub and tighten the lug nuts by hand.
- Use a torque wrench to tighten the lug nuts to the specified torque.
Troubleshooting
Bearing Failure Causes:
- Overloading the trailer
- Insufficient lubrication
- Improper bearing installation
- Contamination in the bearings
Detection of Bearing Failure
- Unusual noises, such as grinding or squealing, from the wheels
- Excessive heat in the hub
- Visible cracks, pits, or wear on the bearings
Prevention of Bearing Failure:
- Regular maintenance and inspections
- Proper lubrication and sealing
- Adhering to the trailer's weight capacity
Stories of Humorous Trailer Bearing Experiences
1. The Overloaded Trailer

A group of friends decided to take their trailer on a long road trip. They packed it to the brim with camping gear, furniture, and souvenirs. Unfortunately, they exceeded the trailer's weight capacity, resulting in premature bearing failure. They learned the hard way that overloading can lead to costly repairs.
2. The Dry Bearings
Another group of friends neglected to lubricate their trailer bearings before a long journey. As a result, the bearings ran dry, overheated, and seized. They were stranded on the side of the road for hours until a passing motorist helped them grease the bearings and get back on the road.

3. The Loose Lug Nuts
A family was driving down the highway when one of their trailer's wheels came off. Fortunately, they were able to pull over safely. Upon inspection, they realized that the lug nuts had not been tightened properly, causing the wheel to detach. They learned the importance of checking lug nut tightness regularly.
Takeaway:
These stories highlight the importance of proper maintenance and inspection of trailer bearings. Overloading, lack of lubrication, and loose lug nuts are common causes of bearing failure that can lead to dangerous and costly situations.
Advanced Features
-
Automatic Bearing Lubrication Systems: These systems automatically lubricate trailer bearings during operation, eliminating the need for manual lubrication.
-
Maintenance-Free Bearings: Some trailer bearings are designed to be maintenance-free for extended periods, reducing the need for frequent inspections and replacements.
-
Magnetic Lube Leak Detectors: These devices can detect even minor lube leaks in trailer bearings, alerting the driver to potential issues before they become major problems.
Potential Drawbacks
-
Cost: Replacing trailer bearings can be a costly repair, especially if professional assistance is required.
-
Time-Consuming: The replacement process can be time-consuming, particularly for inexperienced users.
-
Complexity: It is essential to follow the replacement procedure precisely, as improper installation can lead to bearing failure.
Pros and Cons Table
| Pros |
Cons |
| Improved safety by preventing catastrophic bearing failures |
High cost of replacing bearings |
| Extended trailer life with proper maintenance |
Potential for extended downtime if bearings fail on the road |
| Reduced risk of accidents due to wheel detachment |
Time-consuming replacement process |
| Enhanced performance and fuel efficiency |
Complexity of replacement may require professional assistance |
Frequency of Replacement
The recommended frequency of trailer bearing replacement depends on factors such as the trailer's weight, usage, and operating conditions. As a general guideline:
-
Light-duty trailers (less than 3,500 lbs): 2-3 year intervals
-
Medium-duty trailers (3,500 - 10,000 lbs): 1-2 year intervals
-
Heavy-duty trailers (over 10,000 lbs): 6-12 month intervals
Table of Average Replacement Costs
| Trailer Weight |
Estimated Replacement Cost (USD) |
| Less than 3,500 lbs |
$150-$300 |
| 3,500 - 10,000 lbs |
$250-$500 |
| Over 10,000 lbs |
$400-$800 |
Note: These costs include labor and parts but may vary depending on geographical location and the condition of the bearings and hub.
Maintenance Tips
-
Regular Inspections: Check trailer bearings for signs of wear, damage, or contamination during maintenance.
-
Proper Lubrication: Use high-quality bearing grease and follow the manufacturer's lubrication schedule.
-
Protect from Contamination: Seal bearings properly and avoid exposing them to dirt, water, or other contaminants.
-
Monitor Temperature: Check the hub temperature regularly to detect excessive heat, which may indicate bearing issues.
-
Seek Professional Help: If you are uncomfortable replacing trailer bearings, consult a qualified mechanic or trailer repair technician.
External Resource
Conclusion
Replacing trailer bearings is a crucial maintenance task that ensures the safety, longevity, and performance of your trailer. By following the steps outlined in this guide, you can effectively replace trailer bearings and minimize the risk of bearing failure. Regular inspections, proper lubrication, and timely replacement will help you avoid costly repairs, extend the life of your trailer, and enjoy worry-free travels.
