Conquering Automotive Darkness: A Comprehensive Guide to Alternator Bearing Replacement
Introduction
In the intricate symphony of automotive performance, the alternator stands as a silent maestro, orchestrating the flow of electrical energy throughout the vehicle. However, when the bearings supporting this vital component falter, the car's systems can falter, leaving you stranded in unwelcome darkness. To ensure seamless electrical operation, mastering the art of alternator bearing replacement is paramount. This comprehensive guide will illuminate every step of the process, empowering you to restore your vehicle's electrical vitality.
Understanding the Importance of Alternator Bearings
The alternator, a tireless workhorse concealed within the engine, generates electrical power to recharge the battery and power a multitude of vehicle systems. Bearings, the unsung heroes within the alternator, play a pivotal role in the smooth rotation of its rotor. Failure of these bearings can lead to catastrophic consequences:
-
Electrical Failure: Worn-out bearings increase friction, hindering rotor rotation and reducing power output. This can result in an undercharged battery, flickering lights, and diminished performance.
-
Catastrophic Damage: Severe bearing failure can cause the rotor to seize, resulting in catastrophic damage to the alternator and potentially other engine components. This can lead to costly repairs and extended downtime.
Signs of Failing Alternator Bearings
Early detection of failing alternator bearings is crucial to prevent costly failures. Signs to watch for include:
-
Squeaking or Grinding Noises: The most common symptom is an intermittent or constant squeaking or grinding sound coming from the alternator area.
-
Flickering Lights: Dimming or intermittent flickering of headlights, dashboard lights, or other electrical components can indicate a struggling alternator.
-
Battery Warning Light: On most vehicles, a battery-shaped warning light will illuminate on the dashboard if the alternator is not providing sufficient power to charge the battery.
-
Dimming or Fluctuating Voltage: A multimeter can be used to measure the voltage output of the alternator. Fluctuating or low voltage readings indicate potential bearing issues.
Tools and Equipment for Alternator Bearing Replacement
Before embarking on the alternator bearing replacement, it is essential to gather the necessary tools and equipment, which may vary slightly depending on the vehicle model:

- Socket wrench set
- Screwdrivers (Phillips and flathead)
- Pliers
- Voltage tester (multimeter)
- Belt tensioner tool
- Replacement alternator bearings (matched to your specific vehicle)
Safety Precautions
Working on automotive electrical systems requires utmost caution. Before commencing any work, ensure these safety precautions:
- Park the vehicle on a stable surface and engage the parking brake.
- Disconnect the negative battery terminal to prevent electrical shocks.
- Wear appropriate safety gear, including gloves and safety glasses.
Step-by-Step Alternator Bearing Replacement
With safety measures in place, follow these step-by-step instructions to replace the alternator bearings:

-
Remove the Alternator Belt: Using the belt tensioner tool, loosen the alternator belt and slide it off the alternator pulley.
-
Disconnect Electrical Connections: Unplug the electrical connectors from the alternator, ensuring to note their positions for reassembly.
-
Unbolt the Alternator: Locate and remove the bolts securing the alternator to the engine. Carefully lift the alternator out of the vehicle.
-
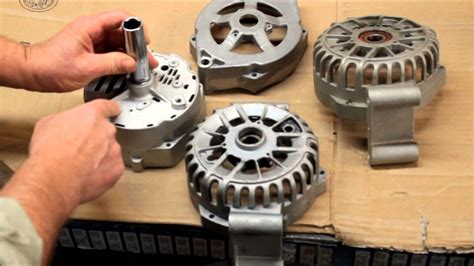
Disassemble the Alternator: Place the alternator on a workbench and remove the bolts or screws holding the front and rear covers together. Carefully separate the housing components.
-
Extract the Rotor: Remove the bolts or screws securing the rotor to the alternator shaft. Use a puller or gently pry the rotor free from the housing.
-
Replace the Bearings: Inspect the bearings for signs of wear or damage. Press out the old bearings using a bearing removal tool and carefully install the new bearings in their place.
-
Reassemble the Alternator: Reverse the disassembly steps to reassemble the alternator housing, ensuring the bearings are properly aligned.
-
Install the Alternator: Position the alternator back into the vehicle and secure it with the mounting bolts.
-
Connect Electrical Connections: Reconnect the electrical connectors to the alternator, paying attention to their original positions.
-
Install the Alternator Belt: Slip the alternator belt back onto the pulley and tighten it using the belt tensioner tool.
Advanced Features of Alternator Bearings
Modern alternators often utilize advanced bearing designs to enhance durability and performance:
-
Sealed Bearings: Sealed bearings prevent contamination from entering the bearing, extending their lifespan and reducing maintenance requirements.
-
Pre-lubricated Bearings: These bearings come pre-lubricated with high-temperature grease, eliminating the need for additional lubrication during installation.
-
Double-Row Bearings: Double-row bearings provide increased load capacity and enhanced stability, particularly important in high-performance applications.
Troubleshooting After Alternator Bearing Replacement
If any issues arise after the alternator bearing replacement, consider these troubleshooting tips:
-
Verify Electrical Connections: Ensure all electrical connectors are securely fastened and making good contact.
-
Check Belt Tension: The alternator belt should be properly tensioned to avoid slippage or over-tightening.
-
Test Alternator Output: Use a multimeter to measure the alternator's voltage output. It should be within the manufacturer's specifications.
-
Inspect for Damage: Carefully inspect the alternator, bearings, and surrounding components for any signs of damage or wear.
Estimated Cost of Alternator Bearing Replacement
The cost of alternator bearing replacement varies depending on several factors, including:
-
Vehicle Make and Model: Different vehicles have unique alternator designs that may affect the cost of bearings and labor.
-
Type of Bearings: Advanced bearing features, such as sealed or pre-lubricated designs, can increase the cost.
-
Labor Costs: The labor required for alternator bearing replacement typically ranges from 1 to 3 hours.
As a general guide, the estimated cost for alternator bearing replacement:
- Parts: $50-$150
- Labor: $100-$300
-
Total Cost: $150-$450
Story 1: The Tale of the Whistling Alternator
-
A perplexed mechanic encountered a customer whose alternator emitted an unusual whistling sound. After extensive diagnostics, they discovered a loose bearing that had slipped out of alignment, causing the rotor to wobble and produce the peculiar noise.
-
Lesson: Even minor bearing issues can manifest in unexpected ways, emphasizing the importance of early detection and repair.
Story 2: The Case of the Dimming Lights
-
An inexperienced driver ignored the flickering lights and squeaky noises coming from their alternator. As they drove, the alternator gradually failed, leaving them stranded on a dark road with a dead battery.
-
Lesson: Neglecting alternator bearing issues can lead to inconvenient and potentially dangerous situations.
Story 3: The Tragedy of the Overtightened Belt
-
In an attempt to fix a loose alternator belt, an overzealous mechanic tightened it excessively. This put undue strain on the bearings, causing them to seize and the alternator to fail.
-
Lesson: Following proper maintenance procedures and avoiding excessive force is crucial to prevent unnecessary damage to alternator components.
Call to Action
If you suspect your alternator bearings are failing, do not hesitate to seek professional assistance. By following the steps outlined in this comprehensive guide and embracing a proactive approach to alternator maintenance, you can ensure the electrical health of your vehicle and prevent costly breakdowns.
Remember, the secret to automotive longevity lies in meticulous maintenance and the timely detection of potential issues. Stay vigilant, listen to your vehicle, and keep your alternator running smoothly for years to come.
Additional Resources
Supplemental Tables
Table 1: Common Symptoms of Failing Alternator Bearings
| Symptom |
Description |
| Squeaking or Grinding Noises |
Intermittent or constant squeaking or grinding sounds from the alternator area |
| Flickering Lights |
Dimming or intermittent flickering of headlights, dashboard lights, or other electrical components |
| Battery Warning Light |
Illumination of a battery-shaped warning light on the dashboard |
| Dimming or Fluctuating Voltage |
Low or fluctuating voltage readings when measuring the alternator's output |
Table 2: Advanced Features of Alternator Bearings
| Feature |
Description |
| Sealed Bearings |
Bearings protected from contamination, extending lifespan and reducing maintenance |
| Pre-lubricated Bearings |
Bearings pre-filled with high-temperature grease, eliminating the need for additional lubrication |
| Double-Row Bearings |
Bearings with two rows of rollers, providing increased load capacity and enhanced stability |
Table 3: Estimated Cost of Alternator Bearing Replacement
| Component |
Cost |
| Bearings |
$50-$150 |
| Labor |
$100-$300 |
| Total Cost |
$150-$450 |
